
In the month of January, the eMerge team would like to give you a few ideas on innovative ways you can use your iPad’s camera to let students learn with video.
Using the camera in the primary grades by Ali Pontious:
Subject: Math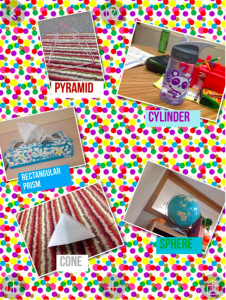
Indicator: Identifies sphere, cone, cylinder, trapezoid, pyramid, triangular prism, and rectangular prism
Tools: iPads; Apps: Camera, PicCollage, and Seesaw
Students will use iPads to snap photos of objects around the classroom. They will then use those photos to make a PicCollage. After students finish their PicCollage, they will upload it to Seesaw for teacher approval and grading.
Subject: Science
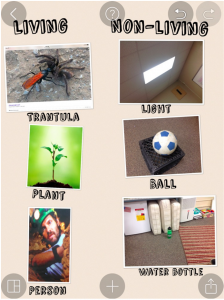 Indicator: Differentiates between living and nonliving things
Tools: iPads; Apps: Camera, PicCollage, and Seesaw
Students will use iPads to snap photos of living and nonliving things outside on the playground. They will then use those photos to make a PicCollage. They will label each photo and identify if it is living or nonliving. After students finish their PicCollage, they will upload it to Seesaw for teacher approval and grading.
Subject: Science
Indicator: Describes how living things change as they grow
Tools: iPads; Apps: Camera, PicCollage, and Seesaw
Students will use iPads to snap photos daily of their grass seed plants. After a couple weeks, they will be able to use their photos in PicCollage. They will use the photos to label and sequence the changes. After students finish their PicCollage, they will upload it to Seesaw for teacher approval and grading.
*Students may choose to use their photos to create an iMovie or iMovie Trailer on their iPads
Using Morpho by Pam Van Fleet:
Using ChatterKids by Jen Kotulak
- Find the APP, ChatterPix Kids, click on gallery or photo depending on what type of photo you want to upload. For this purpose, students previously saved a picture of a landform from safari, thus it will be found in “gallery”.
- Then click on the small orange camera at the bottom. It may ask for permission to access the camera roll, click OK.
- Click on the small image on the bottom left side to access your camera roll.
- Click on the desired photo.
- Adjust the photo accordingly and then click NEXT.
- Draw your mouth in the desired location.
- Click the red microphone button and record your information. You will have 30 seconds to do so. It may ask for permission to access the microphone, click OK.
- When finished recording, click the orange square button to stop.
- You can listen to your recording by clicking the green play button. If you would like to rerecord you can click on the red microphone again.
- Once satisfied with your recording, click NEXT.
- During this step you can modify the color of the project using a filter. You can also add stickers or a frame.
- Click Text and choose a desired font. Type in the text and choose desired color. Then click the green check mark. Move your text by dragging it to the desired position. Make your text larger or smaller using two fingers to pinch or expand.
- Click NEXT.
- Listen to your final project by pressing on the green play button.
- Click on the small ipad/arrow image to export your project.
- Your project is now saved in your camera roll. Click on the Photos App and then camera roll to view.
Ideas to use this app:
- Students describe landforms, moon phases, seasons, animal characteristics, significant person in history, invention, etc.
- Students could take a picture of the book and do a quick retell, or respond to a given prompt/question
- Students can take a photo of themselves and share some information as a “get to know you” activity
- Students can bring illustrations to life
- Students can take a picture of a character in a story and identify character traits
- Students can draw a picture of a social skill and then talk about it